> ## Documentation Index
> Fetch the complete documentation index at: https://docs-new.skyvern.com/docs/llms.txt
> Use this file to discover all available pages before exploring further.
# Quickstart
> Launch a cloud browser, go to a webpage, and extract structured data with Python, TypeScript, or cURL in under 5 minutes.
Run your first browser automation in 5 minutes. By the end of this guide, you'll launch a cloud browser, navigate to Hacker News, and extract the top post title using Skyvern SDK's Page, Agent and Browser methods.
Prefer a visual interface? Try the [Cloud UI](/cloud/getting-started/overview) instead. No code required.
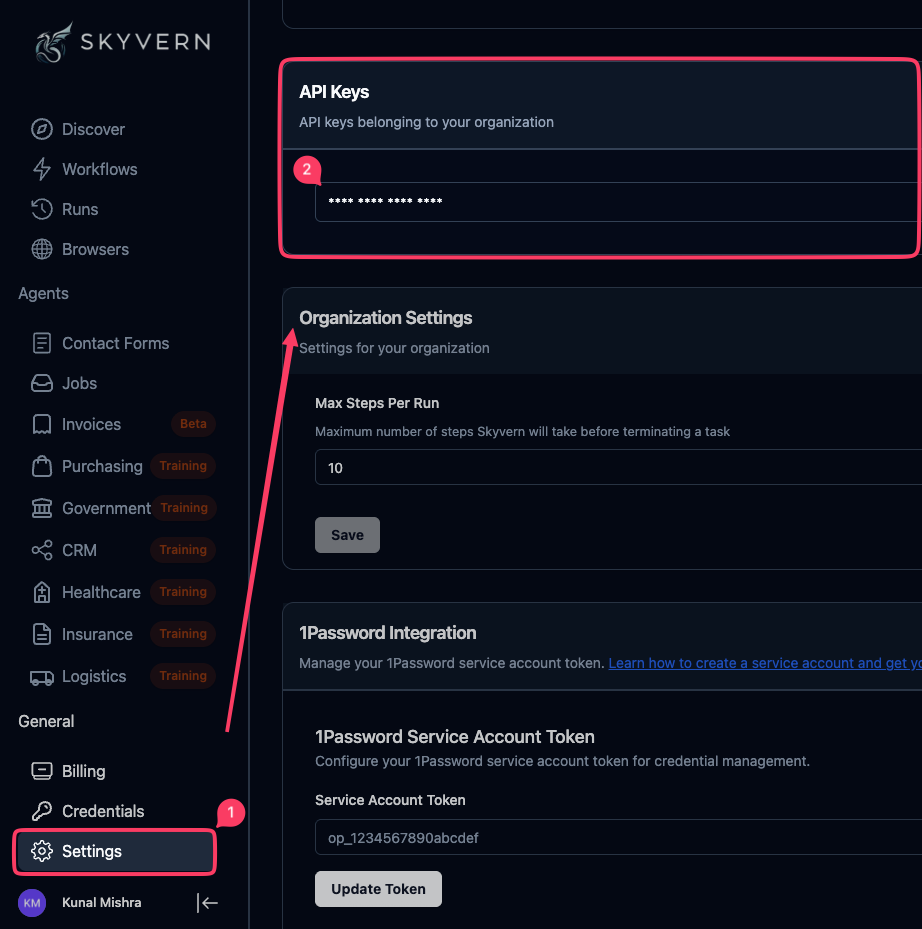
## Step 1: Get your API key
Sign up at [app.skyvern.com](https://app.skyvern.com) and go to [Settings](https://app.skyvern.com/settings) to copy your API key.
## Step 2: Install the SDK
```bash Python theme={null}
pip install skyvern
```
```bash TypeScript theme={null}
npm install @skyvern/client
```
The Skyvern SDK requires Python 3.11, 3.12, or 3.13. If you encounter version errors, try using pipx:
```bash theme={null}
pipx install skyvern
```
pipx installs Python packages in isolated environments while making them globally available.
## Step 3: Launch a browser and extract data
When you call `launch_cloud_browser()`, Skyvern spins up a Chromium instance in the cloud. Your code drives that browser via a Playwright `Page` that also has AI methods (`act`, `extract`, `validate`, `prompt`) layered on top. You can watch the browser live at any time.
```python Python theme={null}
import os
import asyncio
from skyvern import Skyvern
async def main():
skyvern = Skyvern(api_key=os.getenv("SKYVERN_API_KEY"))
# 1. Launch a cloud browser and get a page
browser = await skyvern.launch_cloud_browser()
page = await browser.get_working_page()
print(f"Watch live: https://app.skyvern.com/browser-session/{browser.browser_session_id}")
try:
# 2. Navigate
await page.goto("https://news.ycombinator.com")
# 3. Extract data with an AI prompt
result = await page.extract("Get the title of the #1 post")
print(f"Extracted: {result}")
finally:
# 4. Always close the browser to free cloud resources
await browser.close()
asyncio.run(main())
```
```typescript TypeScript theme={null}
import { Skyvern } from "@skyvern/client";
async function main() {
const skyvern = new Skyvern({ apiKey: process.env.SKYVERN_API_KEY });
// 1. Launch a cloud browser and get a page
const browser = await skyvern.launchCloudBrowser();
const page = await browser.getWorkingPage();
console.log(`Watch live: https://app.skyvern.com/browser-session/${browser.browserSessionId}`);
try {
// 2. Navigate
await page.goto("https://news.ycombinator.com");
// 3. Extract data with an AI prompt
const result = await page.extract("Get the title of the #1 post");
console.log("Extracted:", result);
} finally {
// 4. Always close the browser to free cloud resources
await browser.close();
}
}
main();
```
```bash cURL theme={null}
# The SDK's browser/page pattern is a client-side abstraction over several
# REST calls. For a single curl example, use the task API, which handles
# browser + navigation + extraction as one request:
curl -X POST "https://api.skyvern.com/v1/run/tasks" \
-H "x-api-key: $SKYVERN_API_KEY" \
-H "Content-Type: application/json" \
-d '{
"prompt": "Go to news.ycombinator.com and get the title of the #1 post",
"url": "https://news.ycombinator.com"
}'
```
**Why `page.extract` is enough here.** For a one-shot read on a single page, `page.extract(prompt, schema=...)` returns the extracted data directly (a `dict` in Python, `object` in TS). For multi-step goals like *"log in, navigate to billing, download the invoice"*, use `page.agent.run_task(prompt)` instead; it runs a full AI task loop on the page and returns a [`TaskRunResponse`](/sdk-reference/tasks/run-task#returns-taskrunresponse). See [Build a Browser Automation](/browser-automations/overview) for the full walkthrough.
## Step 4: Understand the output
`page.extract` returns the extracted data as a dict. For the Hacker News example you'll see something like:
```text theme={null}
Watch live: https://app.skyvern.com/browser-session/pbs_519891155782767800
Extracted: {'top_post_title': 'Linux kernel framework for PCIe device emulation, in userspace'}
```
* **`Watch live: ...`** is printed before any AI calls. Open it in another tab to watch the browser navigate and extract in real time.
* **`Extracted: {...}`** appears after `page.extract` returns. The key names come from the AI (unless you pass a `schema`, in which case they match your schema). For typed, predictable output, see [Extract Structured Data](/browser-automations/extract-structured-data).
### If you used the cURL path
The task API is asynchronous. The POST returns a `run_id`; poll for the final result:
```bash theme={null}
RUN_ID="tsk_..." # from the POST response above
while true; do
RESPONSE=$(curl -s -X GET "https://api.skyvern.com/v1/runs/$RUN_ID" \
-H "x-api-key: $SKYVERN_API_KEY")
STATUS=$(echo "$RESPONSE" | jq -r '.status')
echo "Status: $STATUS"
if [[ "$STATUS" == "completed" || "$STATUS" == "failed" || "$STATUS" == "terminated" || "$STATUS" == "timed_out" || "$STATUS" == "canceled" ]]; then
echo "$RESPONSE" | jq '.output'
break
fi
sleep 5
done
```
**Run states:**
* `created`, `queued`: Waiting for an available browser
* `running`: AI is navigating and executing
* `completed`: Task finished successfully
* `failed` / `terminated` / `timed_out` / `canceled`: Non-success terminal states
## Step 5: Watch the recording
Every run is recorded. Two ways to access it:
### Live
While the script runs, the `Watch live: ...` URL printed in Step 3 streams the browser in real time.
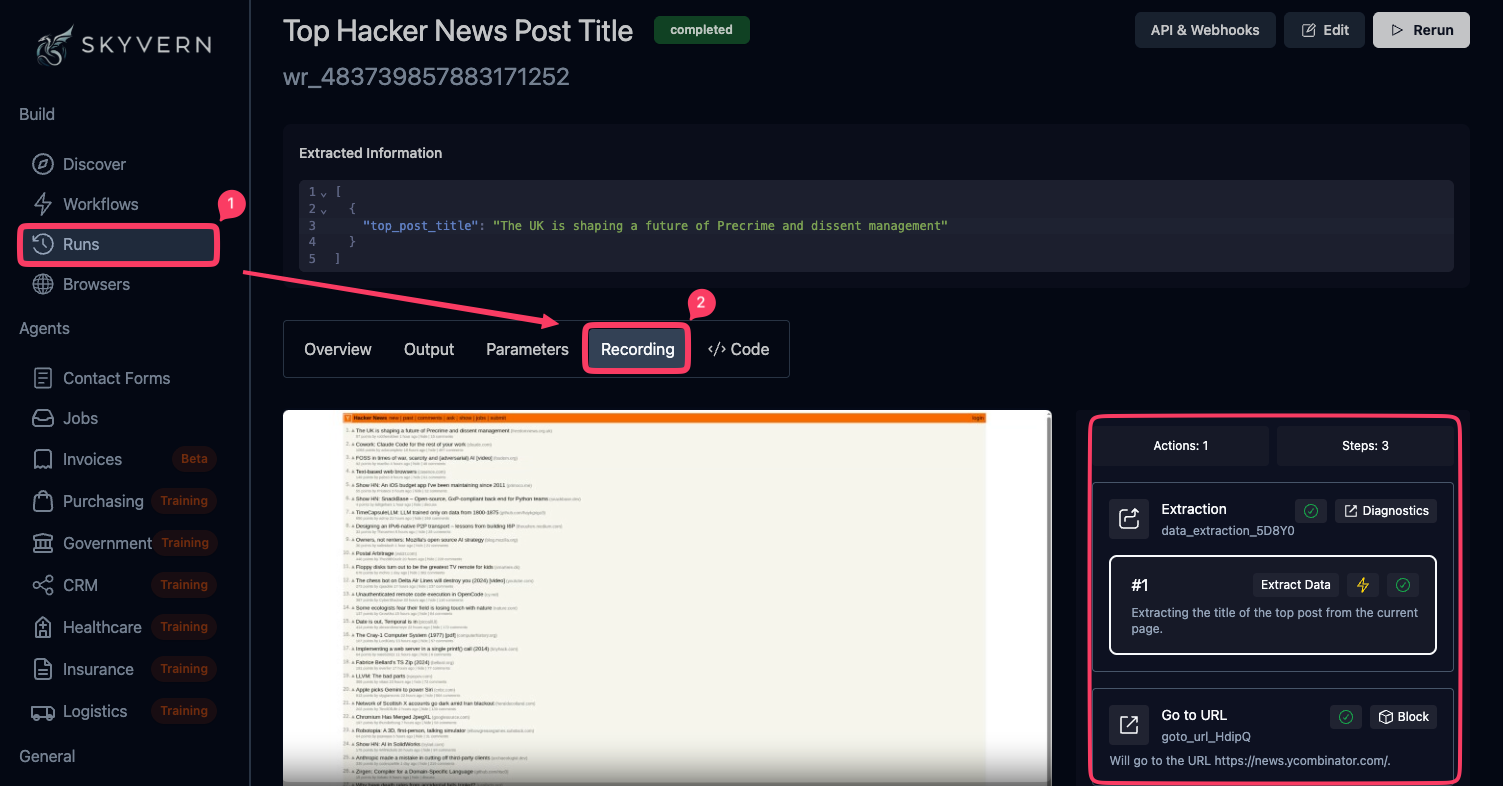
### After the run
Open [Runs](https://app.skyvern.com/runs) and click on your run to see the Recording tab, step-by-step actions with screenshots, and AI reasoning for each decision.
This is invaluable for debugging and understanding how Skyvern interprets your prompts.
***
## Run with a local browser
You can run Skyvern with a browser on your own machine. This is useful for development, debugging, or automating internal tools on your local network.
**Prerequisites:**
* Skyvern SDK installed (`pip install skyvern`)
* PostgreSQL database (local install or Docker)
* An LLM API key (OpenAI, Anthropic, Azure OpenAI, Gemini, Ollama, or any OpenAI-compatible provider)
Docker is optional. If you have PostgreSQL installed locally, Skyvern will detect and use it automatically. Use `skyvern init --no-postgres` to skip database setup entirely if you're managing PostgreSQL separately.
### Set up local Skyvern
```bash theme={null}
# Run this from your app or repo root if you want Claude Code + /qa set up in-place
skyvern quickstart
# Or use setup-only mode if you do not want to start services yet
skyvern init
```
This interactive wizard will:
1. Set up your database (detects local PostgreSQL or uses Docker)
2. Configure your LLM provider
3. Choose browser mode (headless, headful, or connect to existing Chrome)
4. Generate local API credentials
5. Optionally configure local MCP for Claude Code, Claude Desktop, Cursor, or Windsurf
6. Download the Chromium browser
If you choose **Claude Code** during the MCP step and you run the wizard inside a project or repo, Skyvern will:
* write a project-local `.mcp.json`
* pin the MCP command to the active Python interpreter (`/path/to/python -m skyvern run mcp`)
* install bundled Claude Code skills into `.claude/skills/`, including `/qa`
* keep the whole path local, so Claude Code can test `localhost` directly without Skyvern Cloud or browser tunneling
This will generate a .env file that stores your local configuration, LLM api keys and your local `BASE_URL` and `SKYVERN_API_KEY`:
```.env theme={null}
ENV='local'
ENABLE_OPENAI='true'
OPENAI_API_KEY=''
...
LLM_KEY='OPENAI_GPT4O'
SECONDARY_LLM_KEY=''
BROWSER_TYPE='chromium-headful'
MAX_SCRAPING_RETRIES='0'
VIDEO_PATH='./videos'
BROWSER_ACTION_TIMEOUT_MS='5000'
MAX_STEPS_PER_RUN='50'
LOG_LEVEL='INFO'
LITELLM_LOG='CRITICAL'
DATABASE_STRING='postgresql+psycopg://skyvern@localhost/skyvern'
PORT='8000'
...
SKYVERN_BASE_URL='http://localhost:8000'
SKYVERN_API_KEY='eyJhbGciOiJIUzI1NiIsInR5cCI6IkpXVCJ9.....hSo3YA'
```
### Start the local server
If you used `skyvern quickstart` and chose to start services, Skyvern is already running. If you used `skyvern init`, start the server with:
```bash theme={null}
skyvern run server
```
### Run locally
The only difference from cloud is the `base_url` parameter pointing to your local server. The Page/Agent/Browser API is identical, so the same code works in both environments. Develop locally, deploy to cloud without changes.
```python theme={null}
import os
import asyncio
from skyvern import Skyvern
async def main():
skyvern = Skyvern(
base_url="http://localhost:8000",
api_key=os.getenv("SKYVERN_API_KEY"),
)
browser = await skyvern.launch_local_browser()
page = await browser.get_working_page()
try:
await page.goto("https://news.ycombinator.com")
result = await page.extract("Get the title of the #1 post")
print(f"Extracted: {result}")
finally:
await browser.close()
asyncio.run(main())
```
A browser window will open on your machine (if you chose headful mode). Recordings and logs are saved in the directory where you started the server.
If you also selected Claude Code during setup, start your local frontend dev server and run `/qa http://localhost:3000` in Claude Code to validate the app against your local environment.
***
## Next steps
The full Page/Agent/Browser walkthrough: AI actions, Playwright selectors, and agent tasks
Every page action and agent method with parameters and return types
Define a schema to get typed JSON output from your automations
Store credentials securely for sites that require authentication
Chain multiple steps together for complex automations
Get notified when tasks complete instead of polling
 Sign up at [app.skyvern.com](https://app.skyvern.com) and go to [Settings](https://app.skyvern.com/settings) to copy your API key.
## Step 2: Install the SDK
Sign up at [app.skyvern.com](https://app.skyvern.com) and go to [Settings](https://app.skyvern.com/settings) to copy your API key.
## Step 2: Install the SDK
 This is invaluable for debugging and understanding how Skyvern interprets your prompts.
***
## Run with a local browser
You can run Skyvern with a browser on your own machine. This is useful for development, debugging, or automating internal tools on your local network.
**Prerequisites:**
* Skyvern SDK installed (`pip install skyvern`)
* PostgreSQL database (local install or Docker)
* An LLM API key (OpenAI, Anthropic, Azure OpenAI, Gemini, Ollama, or any OpenAI-compatible provider)
This is invaluable for debugging and understanding how Skyvern interprets your prompts.
***
## Run with a local browser
You can run Skyvern with a browser on your own machine. This is useful for development, debugging, or automating internal tools on your local network.
**Prerequisites:**
* Skyvern SDK installed (`pip install skyvern`)
* PostgreSQL database (local install or Docker)
* An LLM API key (OpenAI, Anthropic, Azure OpenAI, Gemini, Ollama, or any OpenAI-compatible provider)